Car wheel painting works only when the wheel is prepared properly, coated in layers, and fully cured before it goes back on the car. The colour matters, but the finish lives or dies on decontamination, film build, and flash-off discipline. In a UK workshop, shortcuts at the prep stage are what usually cause early peel, not the paint shade itself.
Table of Contents
- How Car Wheel Painting Works in a Professional Workshop
- Preparing the Wheel Before Any Paint Is Applied
- Choosing Between Powder Coating and Wet Spray Finishes
- Applying Primer, Colour, and Clear Coat in the Right Order
- Curing, Timing, and Why UK Winters Stress the Finish
- Why Mobile and DIY Wheel Painting Usually Fails Early
- Durability, Warranty, and When to Repaint or Replace
How Car Wheel Painting Works in a Professional Workshop
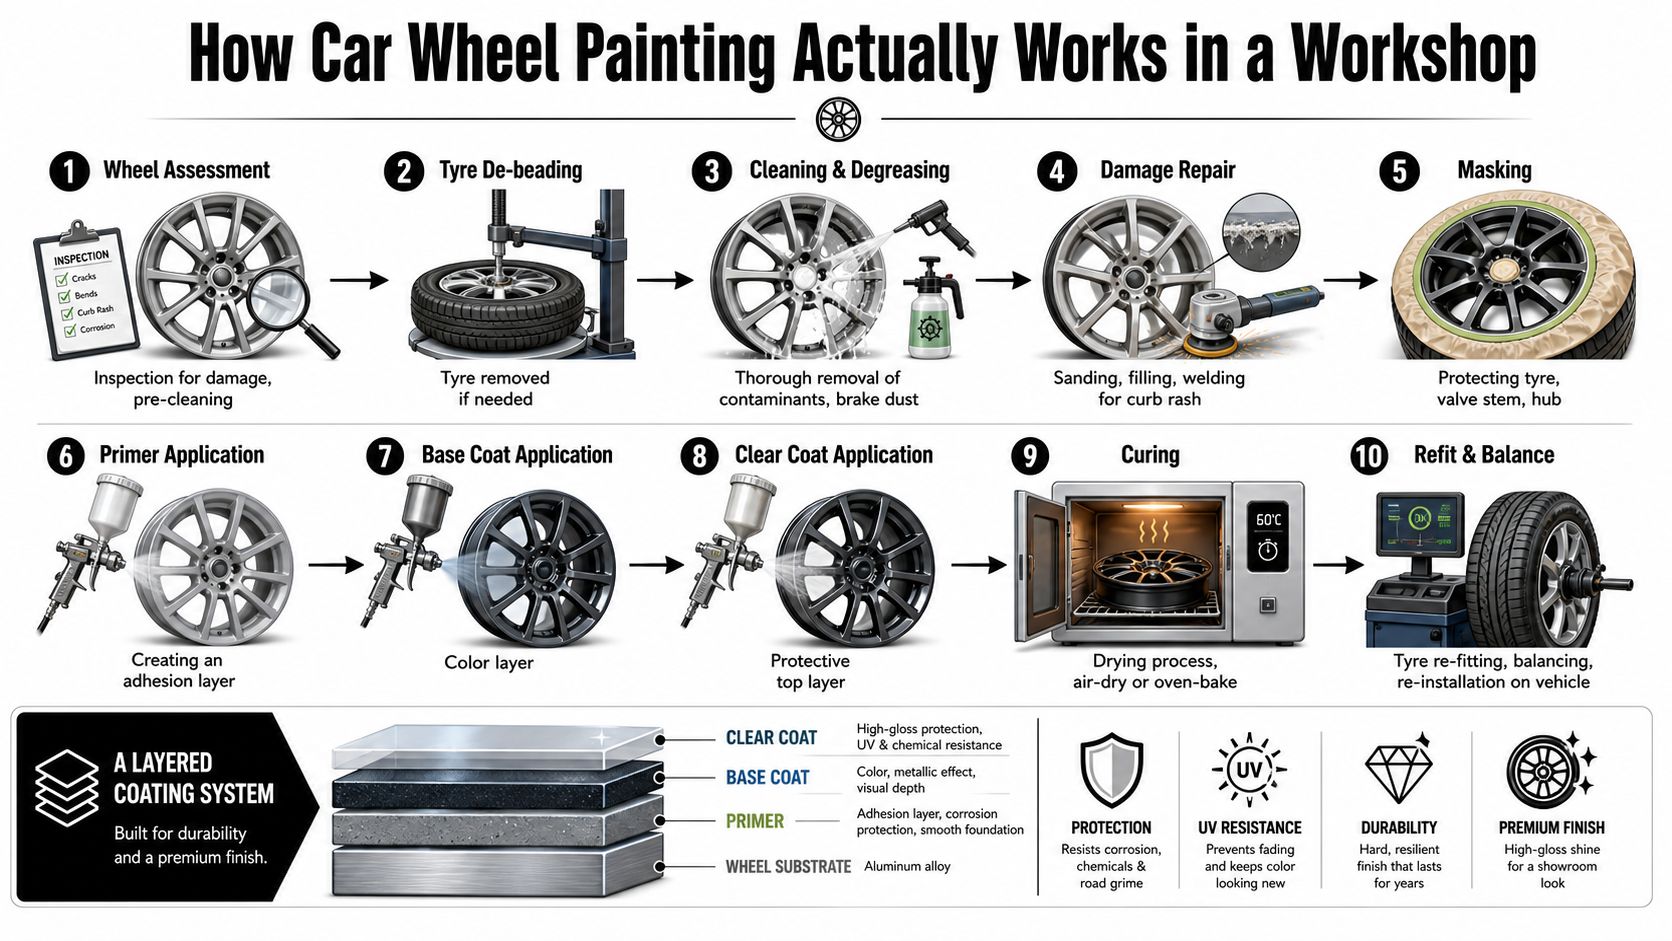
A proper wheel refinish starts with inspection, not the spray gun. The wheel comes off the car, then gets checked for corrosion, curb damage, old lacquer failure, and anything else that would stop the new coating from bonding cleanly. That matters because modern wheel finishes have to do more than look fresh, they have to resist corrosion, brake dust, and road salt in the same way factory coatings developed as wheel and paint technology improved over time DCR Systems history of wheel and paint evolution.
The workshop sequence is layered, not cosmetic
Once the wheel is stripped and cleaned, the finish is built in layers. That usually means primer, colour coat, then clear coat, with the wheel cured before refit so the coating hardens instead of just drying on the surface. Early automotive coatings needed long manual processing, then faster curing systems and base coat, clear coat finishes became standard because manufacturers wanted more durable and repeatable results.
A wheel painter is really controlling three things. First is surface cleanliness, second is film build, third is full cure. Get those wrong and the wheel may look fine for a week, then fail at the spoke edges, in the barrel, or around the bead seat where contamination tends to hide.
Practical rule: if a wheel has not been decontaminated and keyed correctly, the rest of the job is just decoration.
For a customer who wants to understand the process in a workshop context, the useful reference point is a real refurbishment pipeline, not a quick home spray. The Alloy Hub's own behind the scenes wheel refurbishment overview shows how a wheel moves through inspection, stripping, refinishing, and final checks in a controlled facility, which is the difference between a paint job and a proper restoration process.
A useful external parallel is bumper scuff refinishing advice from Derek's Auto Detail, because the same principle applies. Good refinishing depends on preparation and layer control, not on trying to hide damage with one heavy pass of colour.
Preparing the Wheel Before Any Paint Is Applied
This stage decides whether the finish lasts or starts lifting at the first hard winter wash. The wheel has to come off the vehicle, then every trace of brake dust, road film, old polish and loose coating needs to be removed before any sanding begins. A proper prep pass uses a wheel cleaner or mild degreaser, complete drying, and a light sanding around 400 to 600 grit so the surface is keyed for primer and hidden contamination is reduced DriveSmartTools wheel paint guidance.
Why masking is more than tidying up
Tyre masking protects the rubber from overspray, but it also protects the valve stem and centre cap area, where messy edges stand out as soon as the wheel goes back on the car. If the wheel needs it, the tyre is de-beaded or removed so the refinish can reach the inner barrel and bead seat properly. That separates a face-only touch-up from a real wheel refurbishment.
Workshop warning: overspray on rubber, old lacquer left behind, or dust trapped in the spoke corners usually shows up as edge lift first, then peel later.
The prep has to be controlled, not rushed. Sinnek wheel painting process sets out the kind of sequence that works in a workshop, sanding before coating, then building primer, colour, and clear in thin, even layers with proper drying time between stages. That matters because each layer needs a keyed surface and enough flash-off to settle before the next one goes on.
For operators used to coastal or high-contamination environments, the same discipline used in coastal paint stripping tips applies in principle. Salt, moisture and residue do not care whether the substrate is timber, steel or alloy, if the surface is not clean, the coating system starts on the back foot.
Here's the part many rushed jobs miss. The wheel should be inspected after prep, not before it. Corrosion, pitting and old lacquer failure usually become more obvious once the loose material has been removed, and that is when a refinisher decides whether the wheel is a good candidate for paint or whether it needs more than cosmetic work.
Choosing Between Powder Coating and Wet Spray Finishes
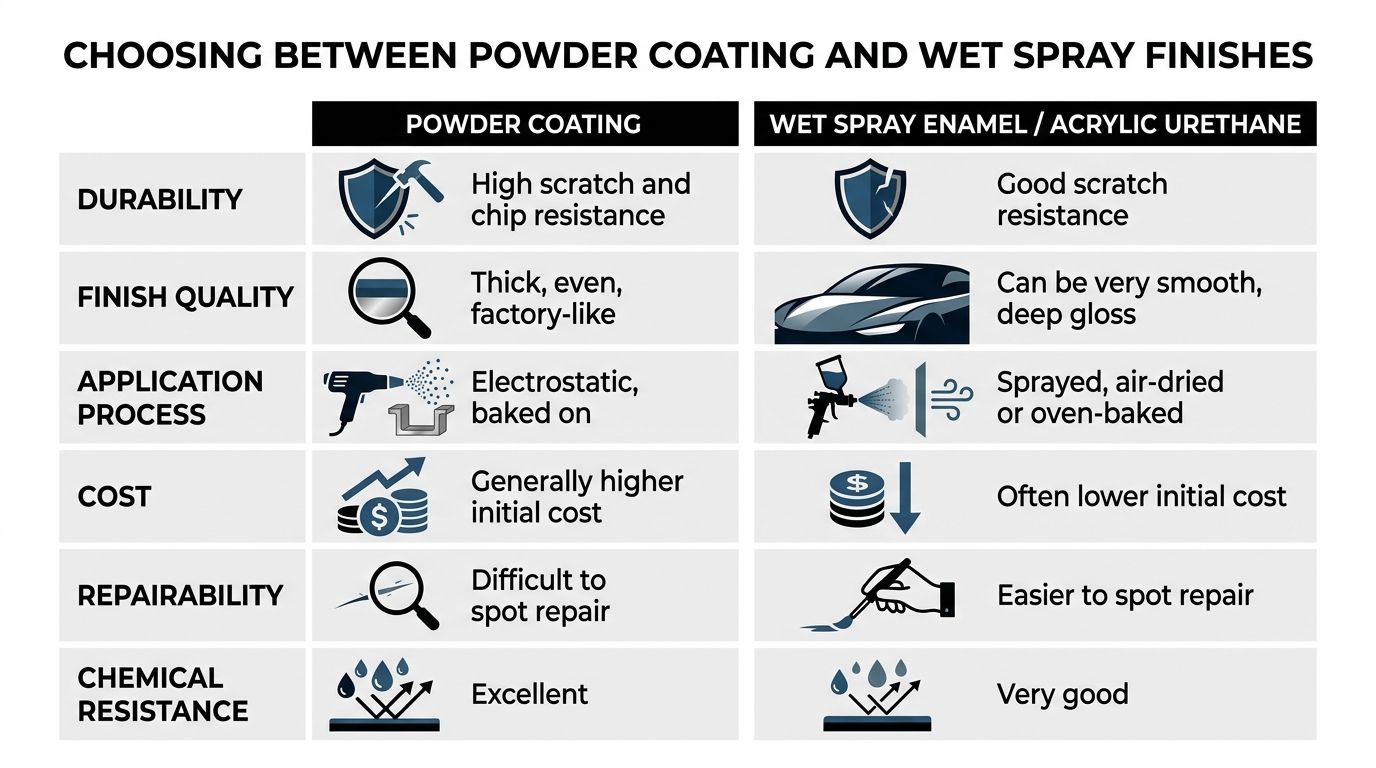
Powder coating and wet spray finishes solve different problems. Powder coating usually gives the harder, more durable shell, while wet spray gives more flexibility on colour matching and finish tailoring. For a normal OEM alloy wheel, the decision comes down to how the car is used, how exact the factory look needs to be, and how easy the finish should be to repair later.
What each coating system does well
Powder coating suits wheels that need a tough, even finish and regular exposure to winter weather. Automotive wheel coatings remain a measurable market category, with demand for painted and coated wheel finishes continuing rather than fading away automotive wheel coatings market report. Wet spray, including modern base coat and clear coat systems, is better when the goal is a close colour match to a factory finish or a satin look that needs to be replicated carefully.
The practical difference shows up after damage. Powder coat is strong, but it's harder to repair neatly if the wheel picks up new kerb rash later. Wet spray is more forgiving for localised touch work, especially if the wheel is staying close to original OEM colour and gloss.
| Coating system | Durability | Repairability | Best use case |
|---|---|---|---|
| Powder coating | Very strong against chips and road use | Harder to spot repair cleanly | Daily drivers, winter use, durable colour refresh |
| Wet spray finish | Strong, but dependent on prep and cure | Easier to blend and match | Factory colour matching, satin and gloss refinishes |
A useful way to think about it is this. Powder coat is about resilience first. Wet spray is about colour control first. That's why a specialist facility often keeps both methods available rather than trying to force every wheel through the same process.
The Alloy Hub's own comparison of what is best, powder coated or painted alloys is relevant here because genuine OEM wheels don't all need the same finish route. A colour refresh on a standard silver BMW alloy and a factory look restoration on a diamond cut Range Rover wheel are different jobs, even if both are called refurbishment.
Applying Primer, Colour, and Clear Coat in the Right Order
A wheel finish survives on layer control. The work starts with clean metal or a sound existing coating, then moves through primer, colour, and clear coat in that order, with each layer laid down thin enough to bond properly and flash off before the next pass. If the paint is forced on too heavy, solvent stays trapped, runs form on the spokes, and the sharp edges are the first places to fail later.
Thin coats beat one heavy coat every time
A proper workshop sequence is primer, base colour, then clear coat. The practical aim is several light passes, not one wet pass that tries to cover too quickly. Some guides specify primer, base colour, and 2 to 3 clear coat layers before full curing and refit Wheelshome pro finishing guide. The exact count matters less than the discipline behind it.
Rule from the booth: if you can see yourself trying to make it cover in one coat, the job is already heading the wrong way.
That layered approach takes time because each coat has to settle before the next one goes on. It also reflects how modern wheel refinishing moved away from older, simpler coating habits and toward base coat and clear coat systems that give better control over colour and gloss. Wheelshome pro finishing guide
Why the inner barrel deserves attention too
The face gets the attention, but the inner barrel is where rushed jobs often cut corners. One production process calls for at least two primer coats, two thin paint coats on the inner wheel, and at least three on the front face before clear coat and drying time Sinnek wheel painting process. That extra attention matters because the inner sections still hold moisture, brake dust, and road contamination.
A wheel can look acceptable from the front and still be poorly finished if the barrel, spoke backs, and edges have thin coverage or an uneven sheen. A proper refinish is judged by the film build across the whole wheel, not by the appearance of the visible face alone.
Curing, Timing, and Why UK Winters Stress the Finish
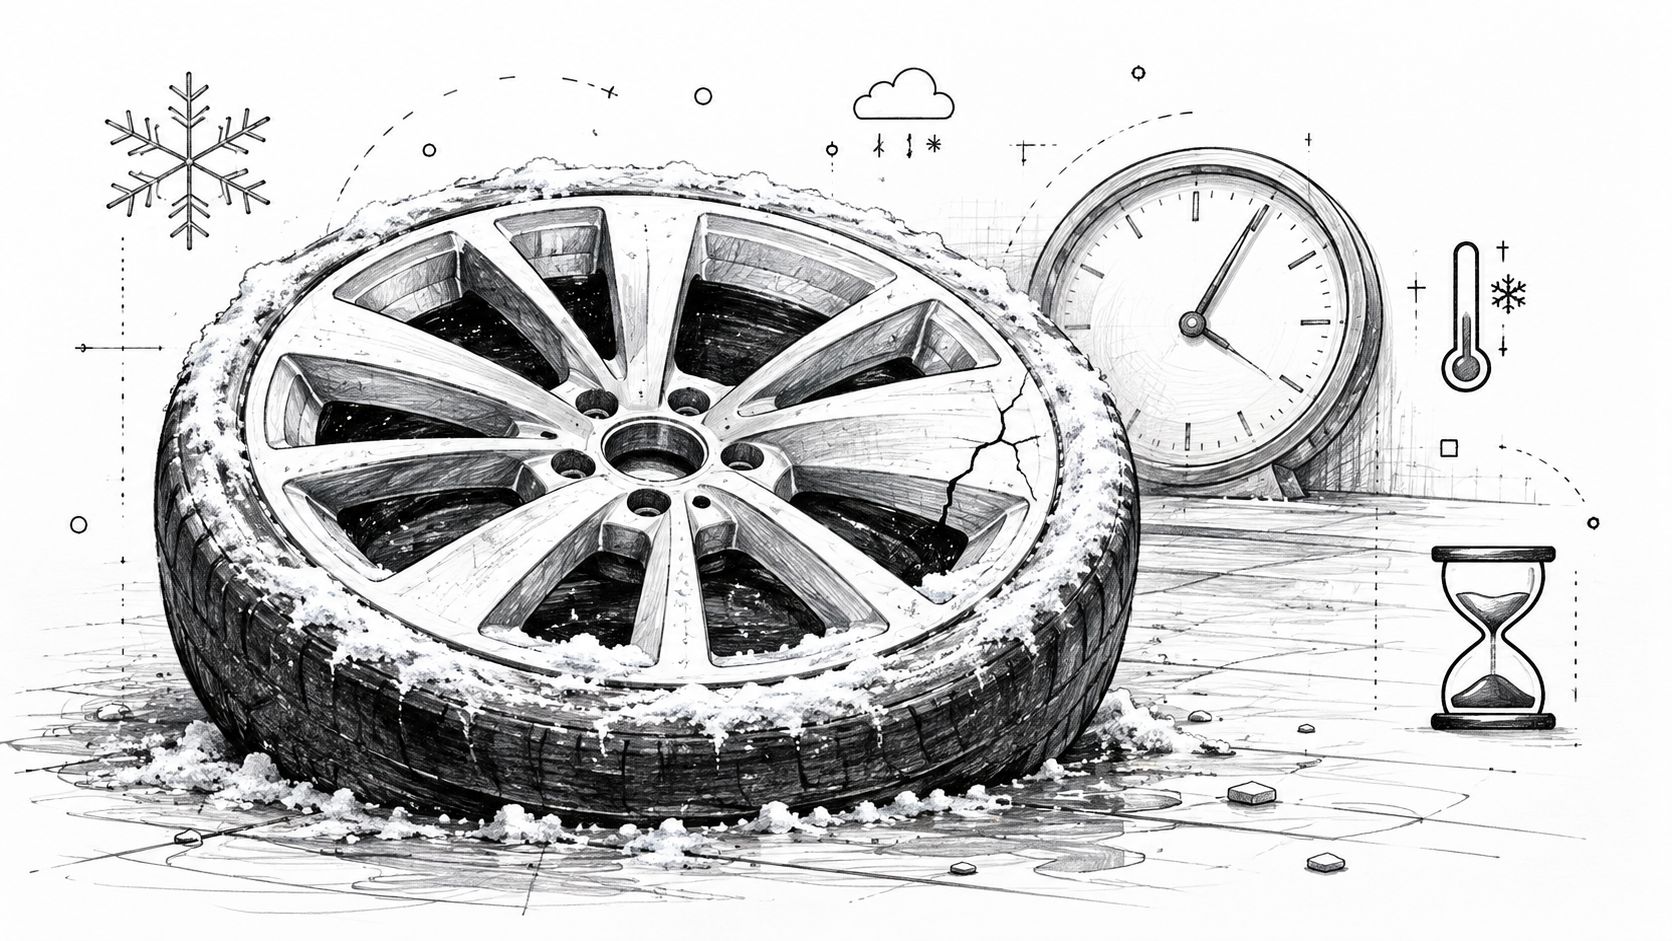
A wheel can look dry and still be nowhere near ready for the road. Curing is the hidden part of the process, and it's where rushing causes most of the failures that show up in the first few weeks. In practical terms, a wheel should not be treated as finished until it has had a full cure window, and a common handling benchmark is about 24 hours before refit or heavy handling CarFromJapan wheel painting guide.
Air dry and oven cure are not interchangeable
Air dry systems depend on patience and the right environment. Oven cure systems harden faster, but they still need the correct timing and temperature cycle to cross link properly. On a wheel, a finish that has only skinned over can still mark, soften or lift once it's back under load and heat.
For anyone comparing coating cure behaviour across different vehicle jobs, how long ceramic coating takes to cure from Lionheart Detailing is a useful parallel. The surface may appear ready far earlier than the coating is stable. The same principle applies here, even though the materials are different.
The other problem in the UK is winter use. Road salt, wet roads and constant temperature changes punish any finish that hasn't cured properly, and short urban trips keep brake dust warm enough to stick aggressively to the wheel surface. That's why a fresh refinish can look good in the bay and still fail early if it goes straight back into daily use.
A wheel that's been refitted too early often shows the same symptoms. Edge softening, dull patches, poor gloss retention and contamination marks appear first, then the finish starts to break down in the most exposed areas. That's not a mystery fault, it's usually a curing fault.
Why Mobile and DIY Wheel Painting Usually Fails Early
Mobile and DIY wheel painting looks cheap because it removes the workshop overhead, but that saving disappears fast when the finish fails. The usual constraints are obvious. Prep is limited, the spray environment isn't controlled, the coating system is often generic and the wheel rarely gets a proper cure cycle before it goes back into use.
The failure pattern is usually the same
The common problems are peel from trapped brake dust, mismatch in sheen, and edge lift on spoke corners. Those faults show up because the wheel never got the same decontamination, masking and flash-off control that a workshop process uses. A wheel may look acceptable from a few feet away, but the first winter wash or road-salt exposure exposes the shortcuts.
The bigger issue is that a home or mobile refinish often ignores the OEM finish specification. Genuine OEM wheels rely on the right sheen, the right colour depth and a durable clear layer, not just a close enough colour from a can. If the finish is wrong, the wheel reads as repaired rather than restored.
Straight answer: if the wheel needs careful colour matching, tight edge coverage and winter durability, a rushed spray job is rarely money well spent.
A proper workshop process is worth the time when the wheel is a genuine OEM unit that still has sound structure. If the wheel is cracked or the corrosion has moved beyond cosmetic damage, painting isn't the answer anymore, replacement is. That's where sourcing a correct genuine wheel matters more than trying to save a tired one with paint.
Durability, Warranty, and When to Repaint or Replace
A properly prepared and fully cured finish should last through normal UK use without needing constant attention, but durability still depends on how the wheel is treated after refit. Regular cleaning helps, and so does avoiding harsh contamination build up on the face and in the barrel care for alloy wheels keep them looking new. If a wheel is structurally sound and the finish is just tired, repainting makes sense. If the alloy is cracked or corrosion has compromised the wheel, replacement does.
| Car Wheel Painting Finish Systems Compared | Durability | Repairability | Best use case |
|---|---|---|---|
| Powder coating | Strong and resistant to road use | Harder to spot repair | High use wheels, winter driving, durable colour refresh |
| Wet spray finish | Good with proper prep and cure | Easier to blend | OEM match work, satin or gloss refinishes |
| Replacement OEM wheel | Depends on wheel condition | Not a repair item | Cracked wheels, severe corrosion, structural failure |
The decision is usually simple once the wheel is in hand. Repaint when the coating has failed but the alloy is still healthy. Replace when the structure isn't right anymore. On genuine OEM wheels, that keeps the car correct and avoids trying to hide a mechanical problem with a cosmetic finish.
The Alloy Hub Ltd supplies genuine OEM alloy wheels and carries out wheel refurbishment in Staffordshire, including powder coating and finish restoration for wheels that are still structurally sound. If you want a single wheel matched to a set or a proper refinished finish on a genuine OEM alloy, visit The Alloy Hub Ltd. and speak to the team about the right route for your wheel.